Conversational Language Understanding for your chatbot
Table of Contents
Enhancing Chatbot Intelligence: The Power of Azure Cognitive Services #
In the previous (article)[https://ruby.mobidev.biz/posts/faq-chatbot/], we ensure that creating a chatbot using the power of Azure Bot Framework SDK is pretty simple. Nevertheless, in some cases, our bot needs more flexibility, especially with interactions with users and recognizing their intents. This is when the Azure Cognitive Service comes into play.
In today’s digital age the effectiveness of a chatbot hinges on its ability to understand and respond to user queries naturally, much like a human conversation. This is where Azure Cognitive Services step in, revolutionizing the way chatbots engage with users.
The Need for Azure Cognitive Services in Your Chatbot #
Imagine having a chatbot that can comprehend user intent, context, and sentiment, enabling it to provide meaningful and contextually relevant responses. Azure Cognitive Services are the catalyst for turning this vision into reality. They address critical challenges that chatbots face, making them an indispensable component of any modern conversational AI solution.
Azure Cognitive Services provides the following features:
- Conversational Language Understanding (CLU)
- Natural Language Processing (NLP)
- Sentiment Analysis
- Multilingual Support
Let’s talk about them in details.
Conversational Language Understanding (CLU) #
Conversational Language Understanding is a cornerstone of Azure Cognitive Services, designed to empower chatbots with the ability to grasp the nuances of human language. One of the primary problems it solves is ambiguity. Humans often express themselves in diverse ways, leaving chatbots bewildered when attempting to discern user intentions. CLU, however, excels in resolving this ambiguity by accurately interpreting user input and extracting valuable insights.
Natural Language Processing (NLP) #
Azure Cognitive Services equip chatbots with the ability to process and comprehend human language naturally. This means understanding slang, colloquialisms, and idiomatic expressions, making interactions with chatbots feel more human-like.
Sentiment Analysis #
By analyzing user sentiment, chatbots can gauge user satisfaction in real-time. This is invaluable for businesses, as it enables them to address concerns promptly, enhance user experiences, and even prevent customer churn.
Multilingual Support #
In a globalized world, businesses often need chatbots to communicate in multiple languages. Azure Cognitive Services provide robust multilingual capabilities, ensuring that your chatbot can cater to a diverse customer base effectively.
Conversational Language Understanding core concepts #
In this article, we will mainly consider CLU as an underlying part of Azure Cognitive Services. Let’s start with a short real-life example:
A customer interacts with a virtual assistant in a banking application. The customer types, “I need to transfer some money to my savings account.” A chatbot powered solely by basic rule-based logic might struggle to decipher the specific intent and parameters of this request. However, by integrating CLU, the chatbot can identify the intent as “Fund Transfer” and extract the required details such as the source and destination accounts, the amount, and any other pertinent information. This deep understanding enables the chatbot to respond effectively, asking clarifying questions if needed and ensuring a seamless, error-free transaction.
Let’s figure out how does CLU actually achieve such results.
How does CLU work? #
Conversational language understanding enables users to build custom natural language understanding models to predict the overall intention of an incoming utterance and extract important information from it. By creating a CLU project, developers can iteratively label utterances, train and evaluate model performance before making it available for consumption. The quality of the labeled data greatly impacts model performance.
To develop custom natural language understanding models, developers should be familiar with three important concepts: utterance, intent and entity.
Utterances, intents and entities in CLU #
Firstly, consider the theoretical part of these concepts:
-
Utterance. An utterance refers to a single, distinct statement or message made by a user in natural language. It represents what a user says or types when interacting with a chatbot or any natural language processing system.
-
Intent. Intent represents the underlying goal or purpose behind a user’s utterance. It answers the question, “What does the user want to achieve or accomplish?” In the context of chatbots and natural language understanding, identifying the user’s intent is crucial for providing relevant and contextually appropriate responses.
-
Entity. An entity is a specific piece of information or data within an utterance that is relevant to the user’s intent. Entities provide context and details about the user’s request. They answer questions like “What,” “Where,” “When,” “How much,” or “Which.”
Now, take a look on projection of these concepts on the real example with a food delivery service:
| Utterance | “I want a large pepperoni pizza” |
| Intent | “order” something from the restaurant |
| Entity | “food-item” - the user wants to order large pepperoni pizza |
These concepts are extremely useful to achieve valuable results using CLU. In the next chapter, we’ll consider how to apply them on the real project.
Conversational Language Understanding project creation #
Preparing infrastructure #
To create CLU project, you need to prepare infrastructure for it first. Since CLU is an Azure service, you have to do it on the Azure Portal.
You will need:
- Azure Subscription
- Resource Group for your Language Service
- Language Service
Creating Project in Language Studio #
Language Studio - is a special tool for working with Azure Cognitive Services. Once infrastructure is ready, go to the Language Studio and create a CLU project using steps below:
- Login to your account (the same as for Azure) and choose Language Service you created on the Azure Portal.
- Press Create new button and choose Conversational language understanding.
- Fill out the project creation form.
Now, you are ready to start creating the language model.
Creating language model #
Open the project you created. On the left side of the window, you’ll find several tabs. Each is responsible for one of the language model creation steps. In the next few paragraphs, we will consider them one by one.
Let’s continue with the example that we used in utterances, intents, and entities explanation, so imagine that we have a simple chatbot for food ordering and we need CLU to improve its user experience.
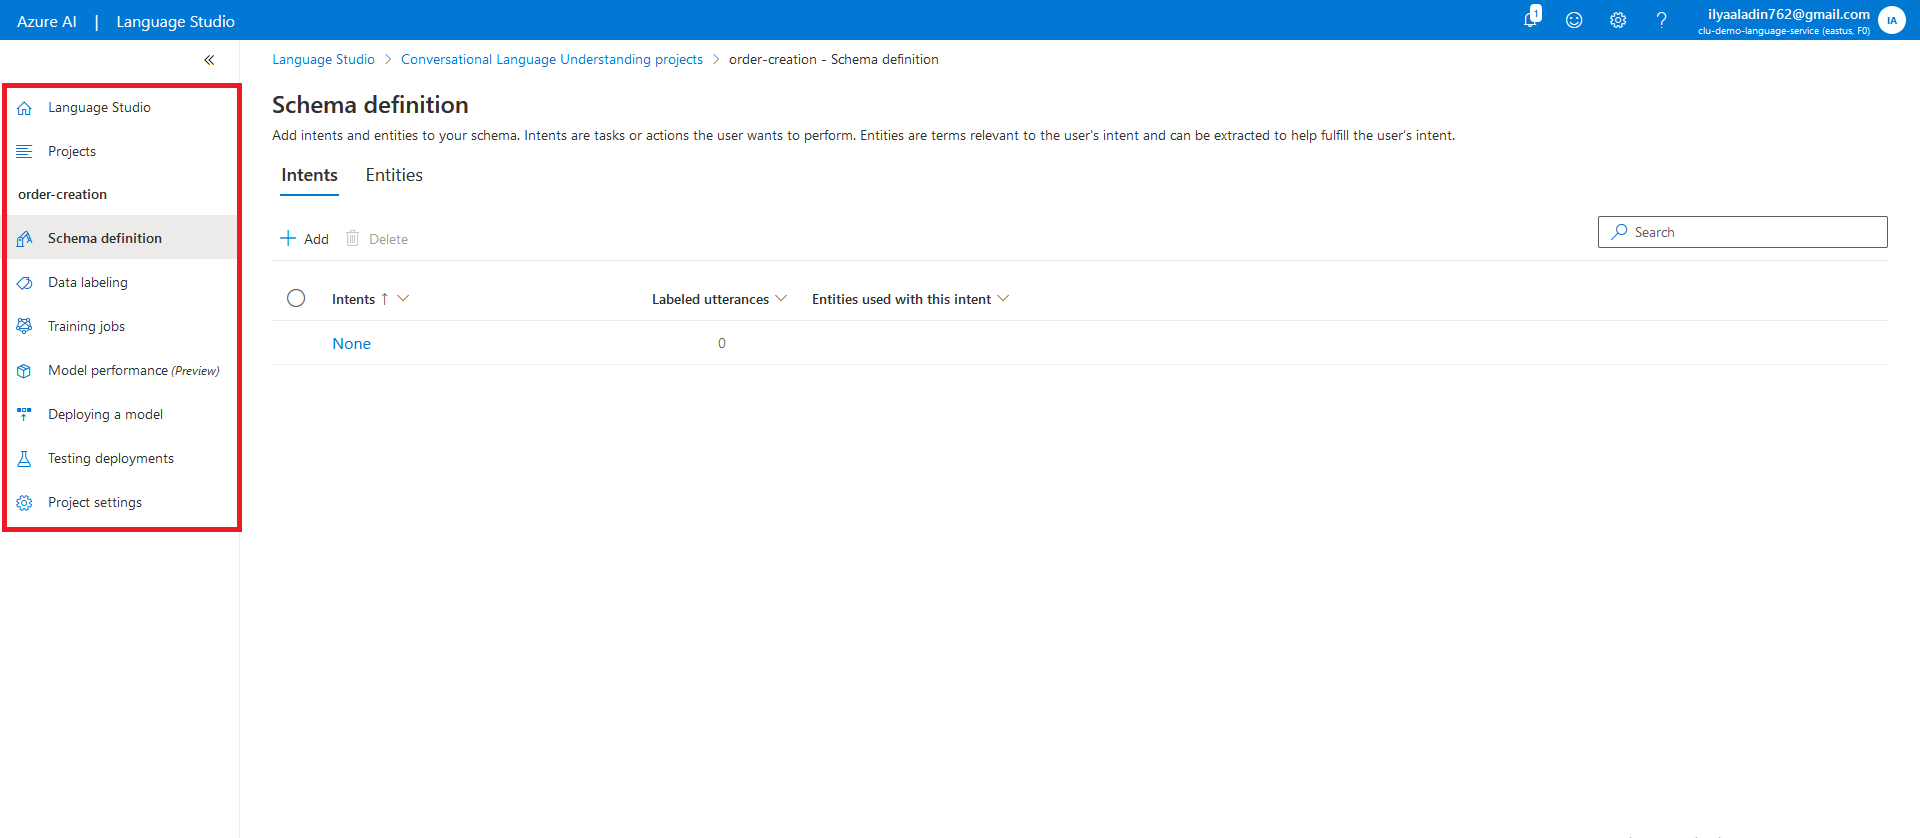
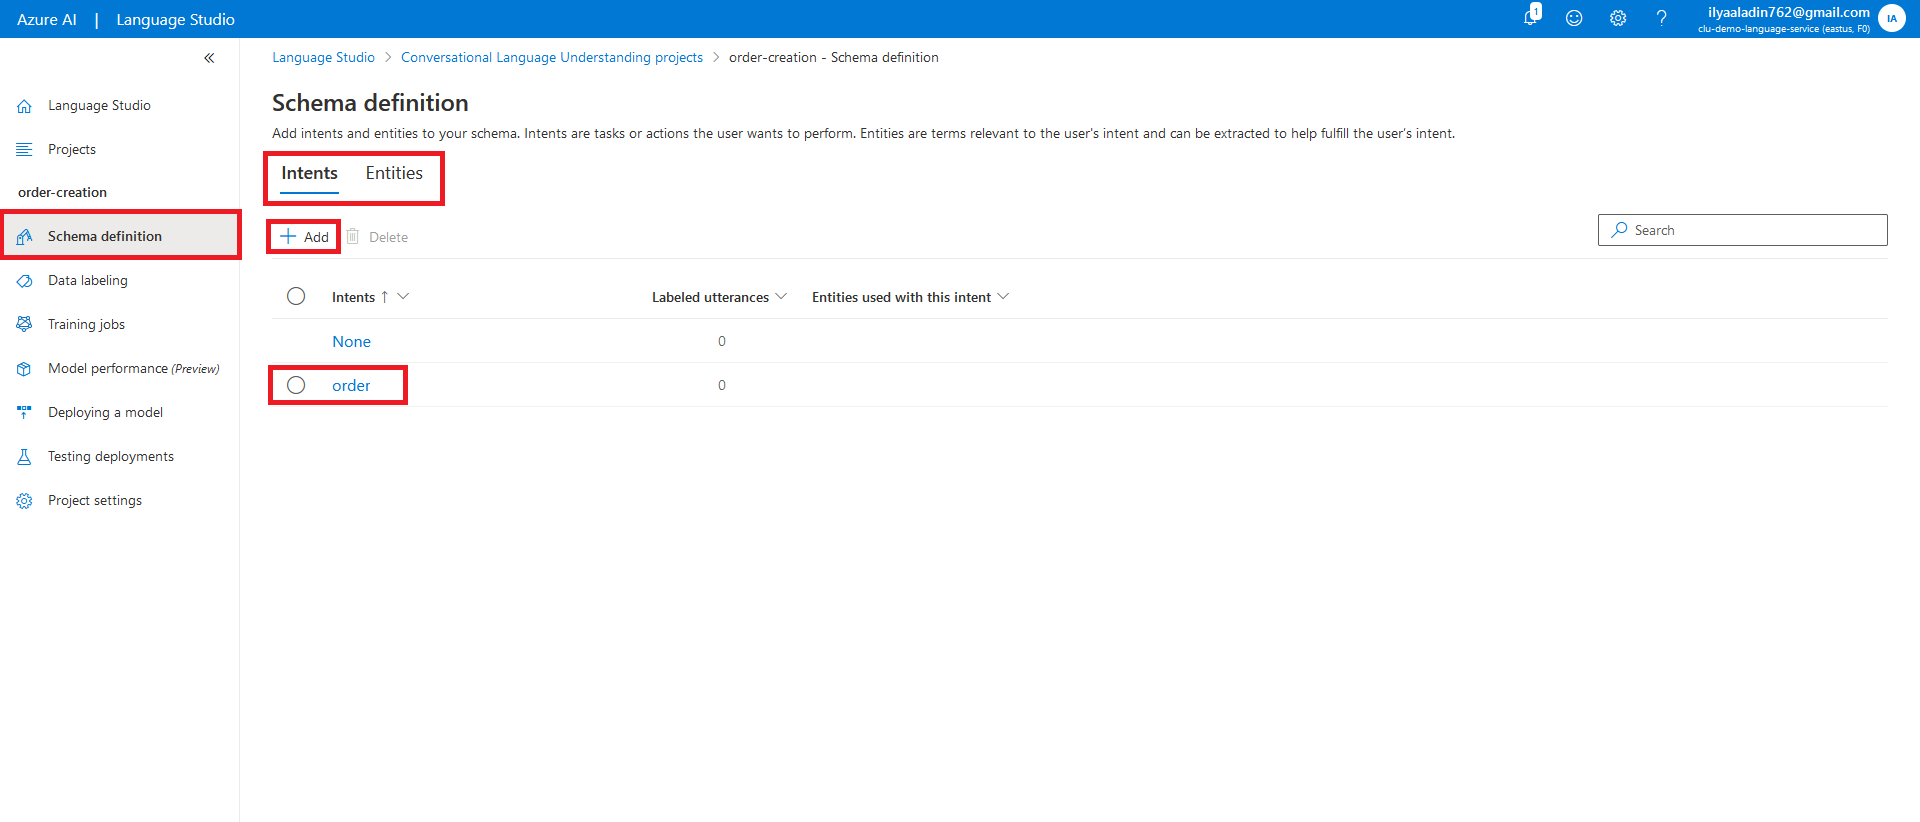
Schema definition #
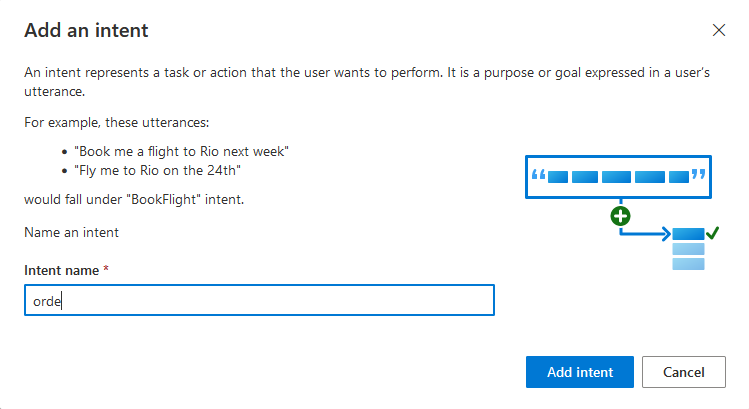
The first step is Schema Definition. During these step, we are adding intents and entities that we want our model to recognize.
Choose what you want to add (Intents or Entities tab) and click Add. Enter a name of the intent/entity and submit entered value.
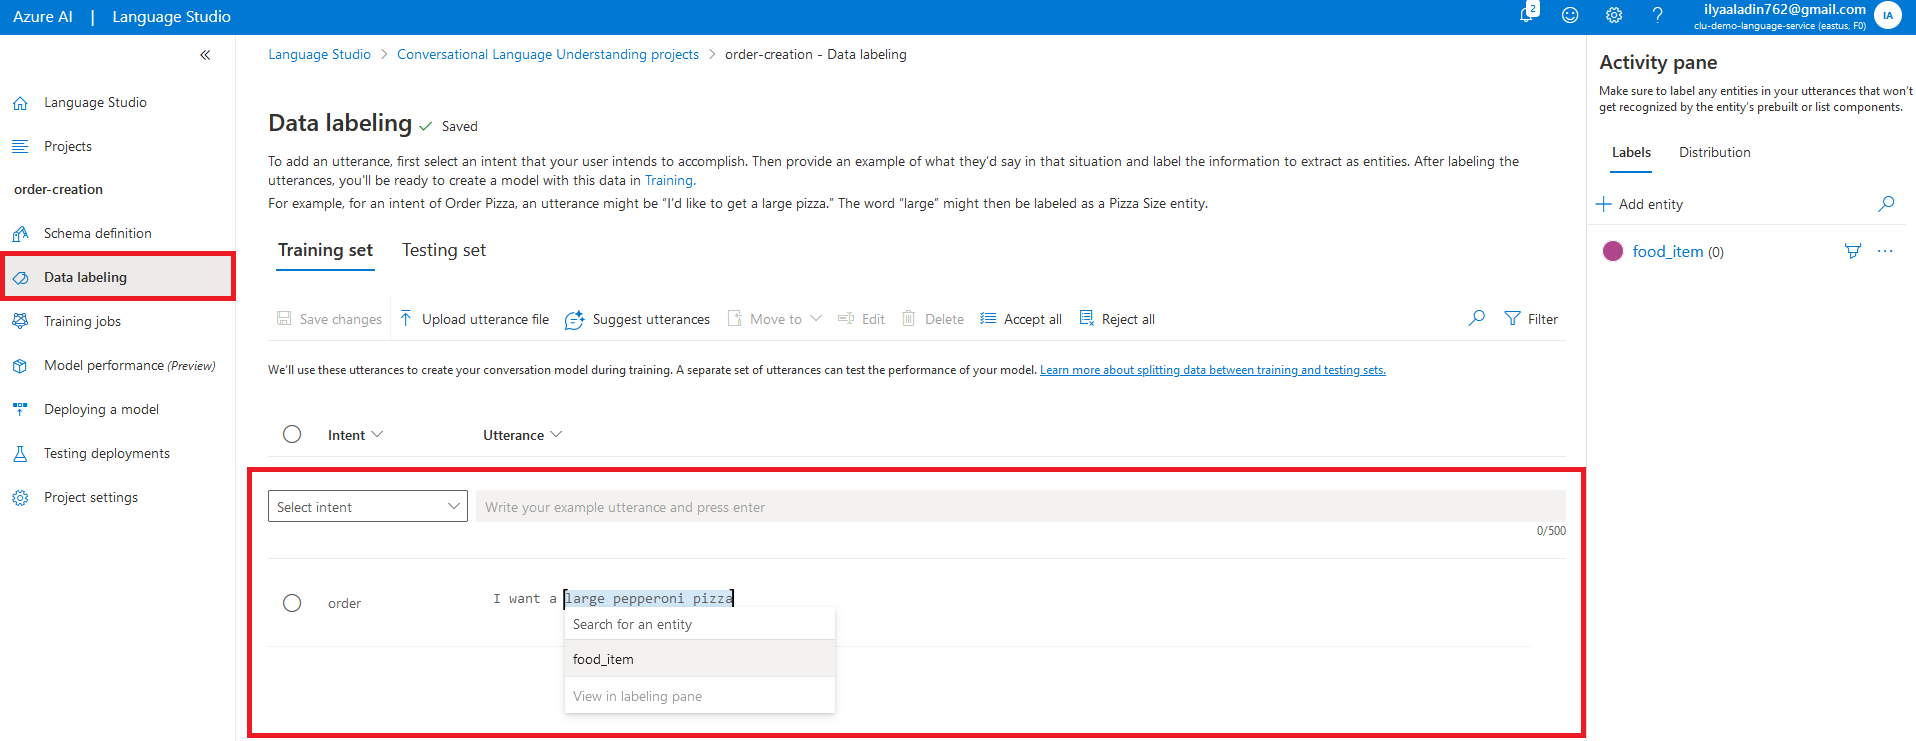
In our case, we added intent order and entity food_item.
Data Labeling #
The purpose of the Data Labeling tab is to add utterances for specific intent and to label entities inside these utterances.
Once you added at least one intent and one entity, you can start with adding utterances and labeling them right on the page.
An interface for adding utterances right on the page could be extremely useful if you just need to add “one more” utterance to your existing data set or for testing purposes. However, in real projects, you will need a large dataset for robust language models, and the process of adding them to the web page could become a bottleneck, furthermore, you possibly will want to save all data that were used to train the model in the GIT repository.
In this case, you can kill two birds with one stone by uploading an utterance file - JSON file formatted in a specific way with utterances and labeled entities.
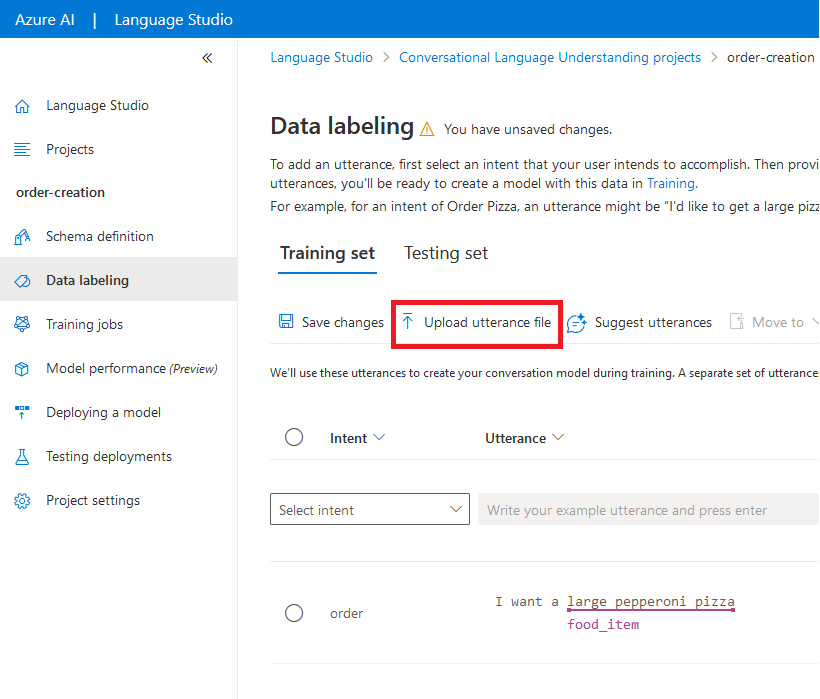
Here is an example of the utterance file.
[
    {
        "intent": "order",
        "language": "en-us",
        "text": "I want a large pepperoni pizza",
        "entities": [
            {
                "category": "food_item",
                "offset": 9,
                "length": 21
            }
        ]
    },
    {
        "language": "en-us",
        "intent": "order",
        "text": "I would like to order some sushi",
        "entities": [
            {
                "category": "food_item",
                "offset": 27,
                "length": 5
            }
        ]
    }
]
In this example:
- array used for entities, so you can add several entities for one utterance through JSON as well
- category - it is the name of an entity
- offset shows the number of characters from the beginning of the utterance to the entity
- length show the length of the entity (“large pepperoni pizza”: 21)
For our sample project, I added additional utterances generated by ChatGPT. You can find them here.
Training jobs #
Once you finished data labeling, you can start training your model. To do this, navigate to Training jobs tab and press Start a training job. In the opened window, simply enter model name and left everything else unchangeable. Then press Train.
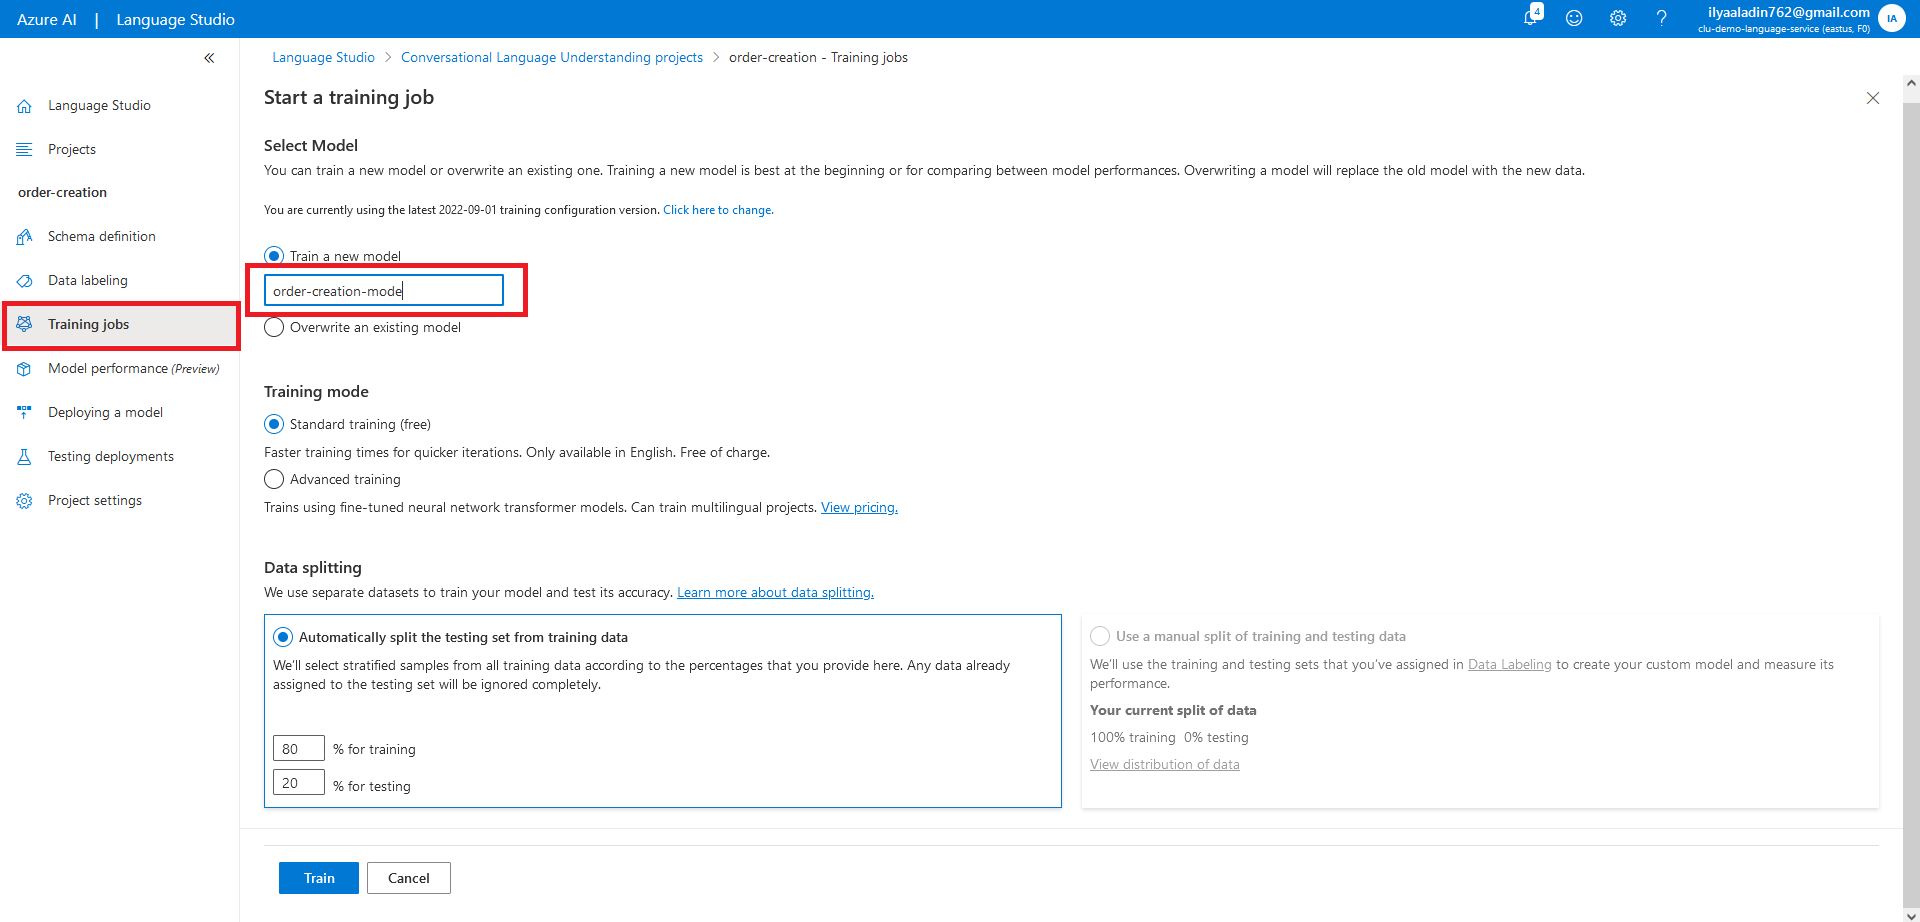
Wait until job is finished.
Deploying a model #
To use and test your language model, you need to create deployment. Open Deploying a model tab and click Add deployment. In the opened window, enter a deployment name and select the model you trained.
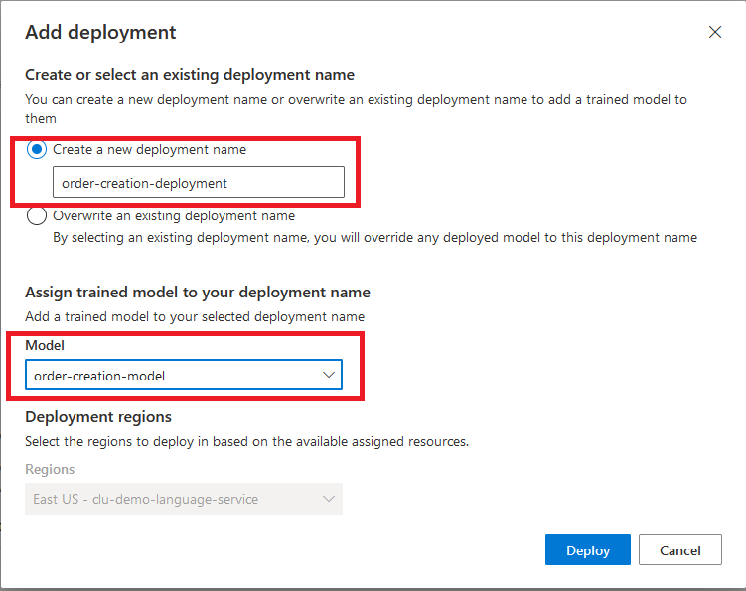
Click Deploy
Testing #
Once you deploy your model, you can test it and make a decision should it be retrained to improve recognition results.
Navigate to the Testing deployments tab and select your recently created deployment. Then enter an utterance, that wasn’t used for model training but should be recognized by the model, to the text field. After that, press Run the test and analyze the results.
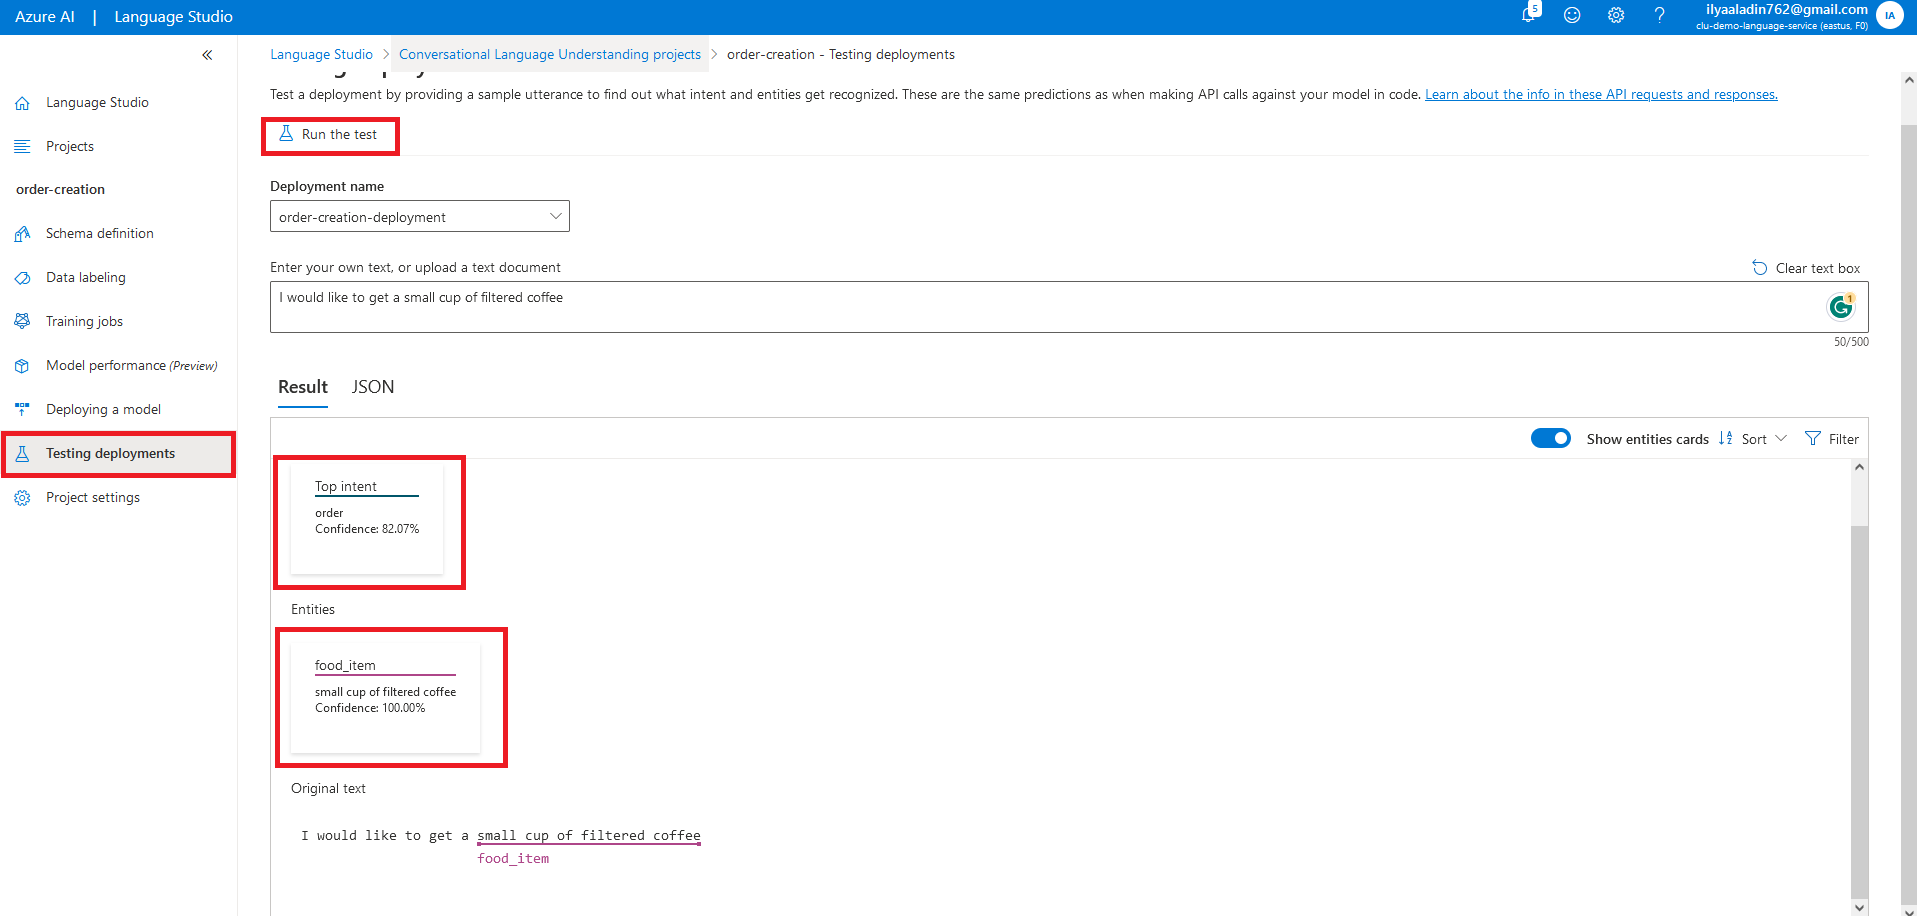
In this case, I used the utterance:
I would like to get a small cup of filtered coffee
As a test result, both intent and entity were recognized correctly. At the same time, if you take a look into data set, that was used for training the model, you will see that during model training nothing was used: nor construction I would like to get nor food item name small cup of filtered coffee.
It is a good example of the value CLU can give us. Furthermore, it’s just a small piece of the whole power.
Usage #
Ensured in the model work correctness, you can start using it for your chatbot.
Back on the Deploying a model tab and choose your deployment. Then press Get prediction URL.
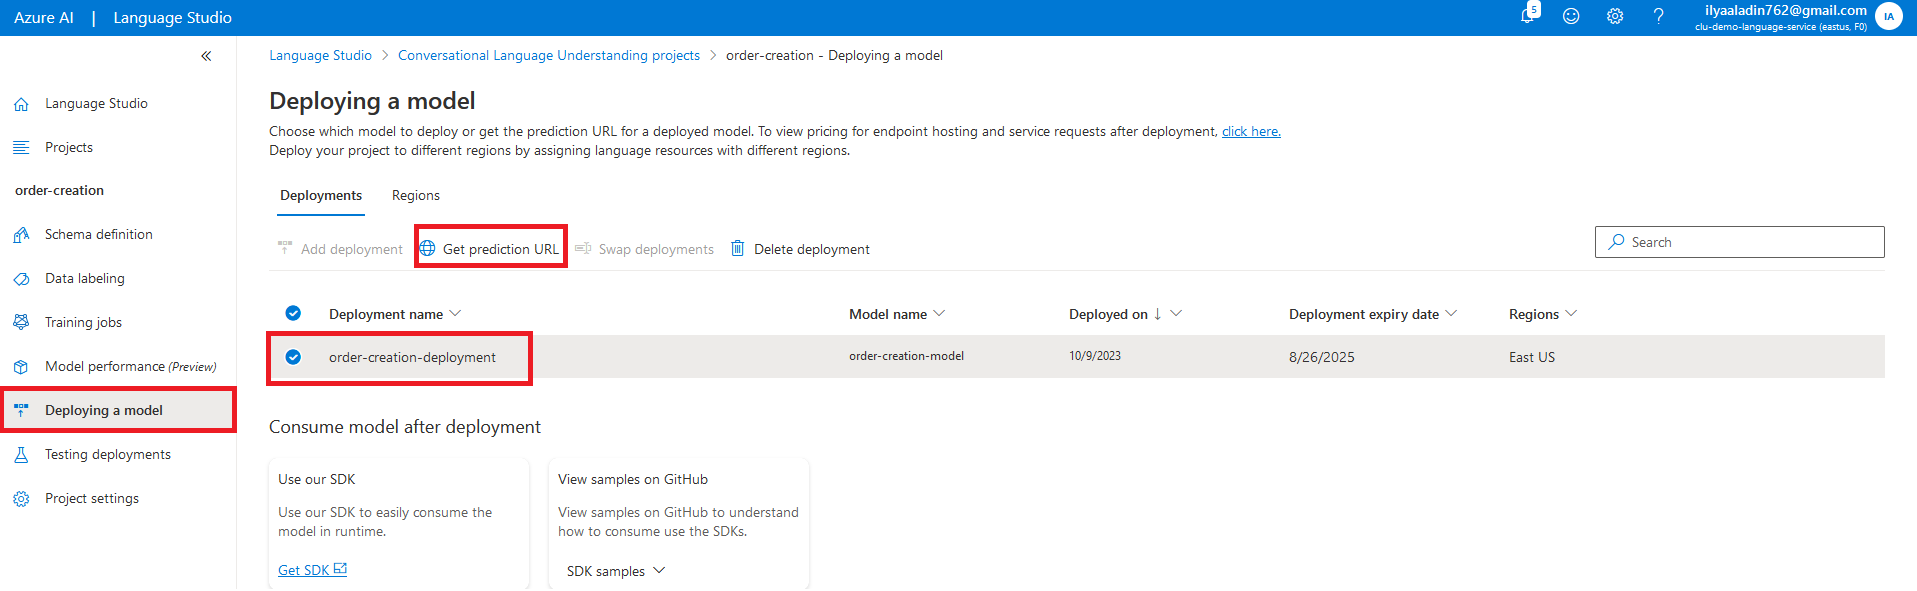
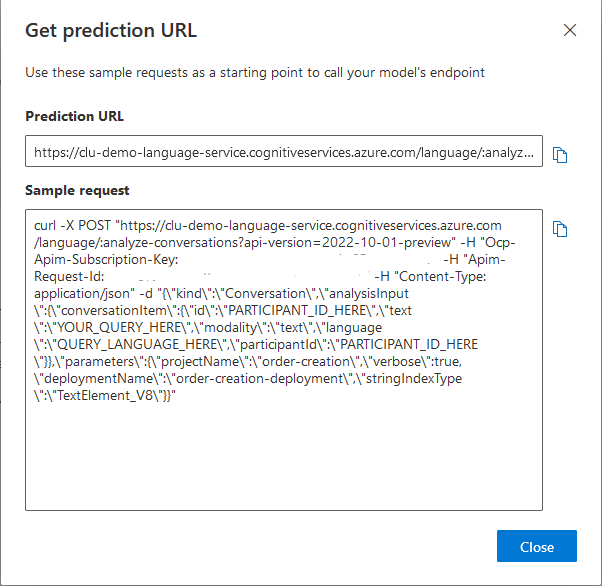
In the opened window, you’ll see Prediction URL - it is a link that you can use for accessing your language model through API.
We are ready to provide expert's help with your product
or build a new one from scratch for you!