How to create Telegram Bot with Ruby
Table of Contents

Intro #
Would you like to automate customer support for your business? Or perhaps you’d like to receive notifications from a 3rd party service that lacks such feature? Then you are in luck because you can build a Telegram bot! Telegram allows you to create customizable chatbots for different purposes.
Pros & Cons of Telegram bot:
Pros
- Free. You can create a bot in Telegram at no cost since there are no subscription models or plans.
- Flexible. Telegram is highly flexible because it offers a wide range of features, such as Inline mode for integrating bots into chats or groups, various button types for creating custom menus, the ability to handle user-provided media, the option to create and manage questionnaires, and a built-in payment system that enables easy payments, among other features.
- Quickly. Using Telegram for your needs will be quick and convenient, as you will not need to create a separate interface. Everything will occur seamlessly within the Telegram platform itself.
Cons
- Limitations. The bot’s usability is constrained by its exclusive availability on Telegram, which limits its integration with webpages or other software interfaces.
- Heavily expandable. When a Telegram bot contains an abundance of complex and intertwined logic, attempting to expand its functionality can become a formidable task due to the potential for unintended consequences, difficult debugging, and the possibility of introducing new errors into the existing codebase.
This article will describe the detailed process of creating a Telegram bot using Ruby. Let’s dive into it!
Telegram Bot registration #
Before we can use the Telegram bot API, we need to register this bot in Telegram itself by using an official Telegram bot FatherBot. You need to do the following things:
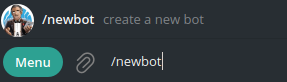
- Write in the chat /newbot (you can select this command from the Telegram menu).


Bot development #
Let’s create a bot that will respond to commands, and integrate a markup-based menu for improved user interaction.
The tool that will help us create our ruby bot is the telegram-bot-ruby gem.
Add it to your Gemfile and run bundle install.
# Gemfile

gem 'telegram-bot-ruby'
Now, we should create the telegram_bot_listener.rb file that will serve as codebase for our bot.
Why telegram_bot_listener? The bot can work in two modes of receiving updates. The first mode is the getUpdate method, and the second method is to get updates via webhooks. For this tutorial, I will use the getUpdate method.
First, we should import the bot’s methods into our telegram_bot_listener.rb.
require 'telegram/bot'Now, let’s create a TelegramBotListener class with an initialize method that will use the API key that we’ve copied earlier and prepare our bot for further usage.
def initialize
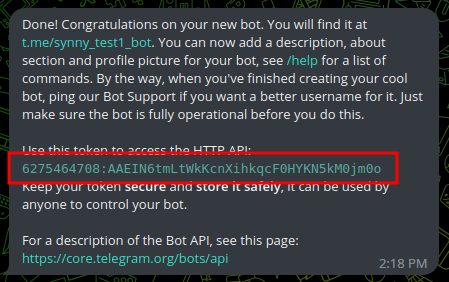
token = "6275464708:AAEIN6tmLtWkKcnXihkqcF0HYKN5kM0jm0o"
@bot = Telegram::Bot::Client.new(token)
endTo start the bot and make it listen to the commands of our users, we should create a method that will process all the incoming messages.
def run_telegram_bot
    @bot.run do |bot|
        bot.listen do |message|

        end
    end
end
We’ve completed our basic setup and can finally dive into command processing and writing custom logic.
Bot response to commands #
When a user starts a bot for the first time, the /start command is automatically sent in the chat with the bot. Think of it as a registration command that will activate our bot.
We should write a handler logic for this command. Since the /start command is just a text message from the user, our bot will receive an object with a text property that contains the user’s message. If the text property contains the /start command, the bot will perform an action that we assigned to this command.
def run_telegram_bot
    @bot.run do |bot|
        bot.listen do |message|
            case message
            when Telegram::Bot::Types::Message
                case message.text
                when "/start"
                    user_full_name = "#{message.from.first_name} #{message.from.last_name}"
                    @bot.api.send_message(chat_id: message.from.id, text: "Hello #{user_full_name} 👋")
                end
            end
        end
    end
end
Now we can start the bot by calling the run_telegram_bot method and trigger it by sending the /start command in chat.

You can also create additional commands for the bot by following the same process we did earlier.
Using markups to create menus #
There are 2 types of interactive buttons in Telegram, or rather 2 types of button markup - ReplyKeyboardMarkup and InlineKeyboardMarkup. The ReplyKeyboardMarkup is always below the chat, while the InlineKeyboardMarkup markup is attached to a specific message and moves around the chat always with it.
ReplyKeyboardMarkup #
First, let’s create an array that will contain basic information about each button.
reply_buttons = [[{text: "Say Hi"}], [{text: "Say Bye"}]]You can see additional button options in the Telegram bot API documentation.
Now let’s create the markup object that will contain an array of parameters we assigned earlier. To enhance user-friendliness, I added a resize_keyboard: true parameter, as Telegram’s default setting generates large buttons on phones, which can make the application less user-friendly.
reply_button_markup = Telegram::Bot::Types::ReplyKeyboardMarkup.new(keyboard: reply_buttons,resize_keyboard: true)To view the recently created markup, you must send a message that contains the parameters of the newly created markup.
@bot.api.send_message(chat_id: message.from.id, text: "Here are your reply buttons", reply_markup: reply_button_markup)Let’s add a new command handler /generate_reply to make sure our bot can identify and display our buttons.
As a result, we got this:
when "/generate_reply"
    reply_buttons = [[{text: "Say Hi"}], [{text: "Say Bye"}]]
    reply_buttons_markup = Telegram::Bot::Types::ReplyKeyboardMarkup.new(keyboard: reply_buttons, resize_keyboard: true)
    @bot.api.send_message(chat_id: message.from.id, text: "Here are your reply buttons", reply_markup: reply_buttons_markup)
end
InlineKeyboardMarkup #
The process of creating these buttons is similar to the process of creating Reply buttons.
First, we create an array with the buttons we need. For this tutorial, the first button will redirect the user to Youtube, and the second button will be used as a callback.
inline_buttons = [[Telegram::Bot::Types::InlineKeyboardButton.new(text: "Youtube Link", url: "https://www.youtube.com/")],
Telegram::Bot::Types::InlineKeyboardButton.new(text: "Link with callback", callback_data: "I am callback data")]
Let’s create the markup for these buttons.
inline_buttons_markup = Telegram::Bot::Types::InlineKeyboardMarkup.new(inline_keyboard: inline_buttons, resize_keyboard: true)Now, let’s send a message that uses the current markup to the chat.
@bot.api.send_message(chat_id: message.from.id, text: "Here are your inline buttons", reply_markup: inline_buttons_markup)As a result, we got this:
when "/generate_inline"
    inline_buttons = [[Telegram::Bot::Types::InlineKeyboardButton.new(text: "Youtube Link", url: "https://www.youtube.com/")],
    Telegram::Bot::Types::InlineKeyboardButton.new(text: "Link with callback", callback_data: "I am callback data")]
    inline_buttons_markup = Telegram::Bot::Types::InlineKeyboardMarkup.new(inline_keyboard: inline_buttons, resize_keyboard: true)
    @bot.api.send_message(chat_id: message.from.id, text: "Here are your inline buttons", reply_markup: inline_buttons_markup)
end
Summary #
As a result, we got the following code, which responds to commands and creates different types of markups.
when Telegram::Bot::Types::Message
    case message.text
    when "/start"
        user_full_name = "#{message.from.first_name} #{message.from.last_name}"
        @bot.api.send_message(chat_id: message.from.id, text: "Hello #{user_full_name} 👋")
    when "/generate_reply"
        reply_buttons = [[{text: "Say Hi"}], [{text: "Say Bye"}]]
        reply_buttons_markup = Telegram::Bot::Types::ReplyKeyboardMarkup.new(keyboard: reply_buttons, resize_keyboard: true)
        @bot.api.send_message(chat_id: message.from.id, text: "Here are your reply buttons", reply_markup: reply_buttons_markup)
    when "/generate_inline"
        inline_buttons = [[Telegram::Bot::Types::InlineKeyboardButton.new(text: "Youtube Link", url: "https://www.youtube.com/")],
        Telegram::Bot::Types::InlineKeyboardButton.new(text: "Link with callback", callback_data: "I am callback data")]
        inline_buttons_markup = Telegram::Bot::Types::InlineKeyboardMarkup.new(inline_keyboard: inline_buttons, resize_keyboard: true)
        @bot.api.send_message(chat_id: message.from.id, text: "Here are your inline buttons", reply_markup: inline_buttons_markup)
    end
end
Generally speaking, the functionality I have explained above is sufficient to create a basic Telegram bot. However, it is important to keep in mind that Telegram offers many other features such as built-in payment options, group or chat management, and poll creation and management, which can greatly enhance the functionality of your bot.
Improvement #
Currently, all of the bot’s logic is stored in one file. In order to make the bot more readable and comprehensible, I have extracted the processing of each command into a separate method.
Our code handles three different commands directly written in the bot file. However, all these handlers can be placed into separate methods to enhance the readability of the bot’s code. To achieve this, you can create another file, such as commands_handler.rb, containing a CommandsHandler class. This class will be responsible for processing the commands.
# commands_handler.rb

class CommandsHandler
  def initialize(bot)
    @bot = bot
  end

  def start(message)
    # implementation of the 'start' command
    user_full_name = "#{message.from.first_name} #{message.from.last_name}"
    @bot.api.send_message(chat_id: message.from.id, text: "Hello #{user_full_name} 👋")
  end

  def send_reply_markup(message)
    # implementation of sending a message with reply markup
    reply_buttons = [[{text: "Say Hi"}], [{text: "Say Bye"}]]
    reply_buttons_markup = Telegram::Bot::Types::ReplyKeyboardMarkup.new(keyboard: reply_buttons, resize_keyboard: true)
    @bot.api.send_message(chat_id: message.from.id, text: "Here are your reply buttons", reply_markup: reply_buttons_markup)
  end

  def send_inline_markup(message)
    # implementation of sending a message with inline markup
    inline_buttons = [[Telegram::Bot::Types::InlineKeyboardButton.new(text: "Youtube Link", url: "https://www.youtube.com/")],
    Telegram::Bot::Types::InlineKeyboardButton.new(text: "Link with callback", callback_data: "I am callback data")]
    inline_buttons_markup = Telegram::Bot::Types::InlineKeyboardMarkup.new(inline_keyboard: inline_buttons, resize_keyboard: true)
    @bot.api.send_message(chat_id: message.from.id, text: "Here are your inline buttons", reply_markup: inline_buttons_markup)
  end
end
The telegram_bot_listener.rb file code will look like this:
# telegram_bot_listener.rb

require 'telegram/bot'
require_relative 'commands_handler'

class TelegramBotListener
    def initialize
        token = "6275464708:AAEIN6tmLtWkKcnXihkqcF0HYKN5kM0jm0o"
        @bot = Telegram::Bot::Client.new(token)
        commands_handler = CommandsHandler.new(@bot)
    end

    def run_telegram_bot
        @bot.run do |bot|
            bot.listen do |message|
                case message
                when Telegram::Bot::Types::Message
                    case message.text
                    when "/start"
                        commands_handler.start(message)
                    when "/generate_reply"
                        commands_handler.send_reply_markup(message)
                    when "/generate_inline"
                        commands_handler.send_inline_markup(message)
                    end
                end
            end
        end
    end
end

TelegramBotListener.new.run_telegram_botWe are ready to provide expert's help with your product
or build a new one from scratch for you!