Stripe Payment Gateway Integration in Ruby on Rails App
Table of Contents
Payments are an integral part of most web applications. Whether it’s an online store, a SaaS platform, or a hotel booking site, they all need to accept payments.
What do you need to accept payments? #
To accept payments in the application, the integration of the Payment Gateway is required. Payment Gateway is an intermediary between the site and the payment system. You won’t be able to accept payments without it.
There are several popular payment gateways: Braintree, Stripe, and Paddle. In this article, we will look at the most popular integration — Stripe.
What is Stripe? #
Stripe is a payment gateway that is easy to integrate into the Ruby on Rails app. It allows you to pay in 135+ currencies, accepts local payment methods, and meets all necessary Security Standards. You can find out what commission Stripe takes from payments on the official website.
Before you start integrating #
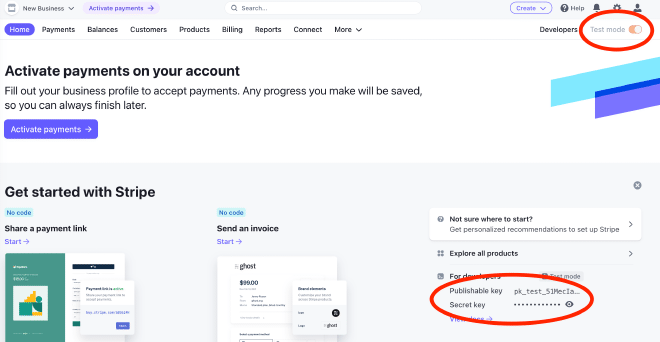
First, register an account on Stripe. It does not require any payment from your side, Stripe is completely free for development.
In the future, to accept real payments, you will need to activate payments. To do this, depending on the region, you will have to fill out a form and pass verification. However, this is not required for development, so we will skip this step.
After registration, you will see the Dashboard. Enable the Test mode if it wasn’t enabled by default. In the next steps, we will need to copy the Publishable key and Secret key from this page.
Stripe integration into the Rails app #
Application example #
We have created a Rails 7 application in which we have authentication with the Devise gem. You can find the repository with the completed application here.
Let’s create a model and controllers for the Order:
rails g scaffold order user:belongs_to total:integer status:integer
Here we have a binding to the user, the amount and status of the order.
In the Order model, specify an enum for the order status:
class Order < ApplicationRecord
   belongs_to :user

   enum status: [:pending, :processing, :failed, :succeed]
end
Now let’s create a new order:
Payment page #
To accept payments, we will create a separate page.
Let’s add a new route in the routes.rb file:
resources :orders do
   get "/pay", to: "payments#pay", as: :pay
end
Let’s create a new controller payments_controller.rb:
class PaymentsController < ApplicationController
   before_action :authenticate_user!

   def pay
     @order = Order.find(params[:order_id])
   end
end
And a new view payments/pay.html.erb:
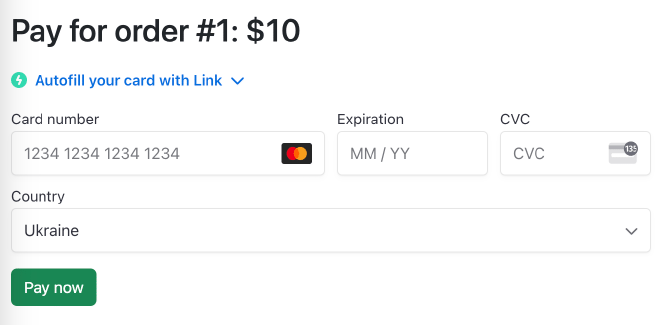
<h1>Pay for order #<%= @order.id %>: $<%= @order.total / 100 %></h1>
Please note that Stripe accepts the amount for payment without a decimal separator, that is, $1.00 is 100, and $123.45 is 12345. I suggest immediately using this approach to store amounts in our database. Therefore, in order to correctly display the amount, it must be divided by 100:
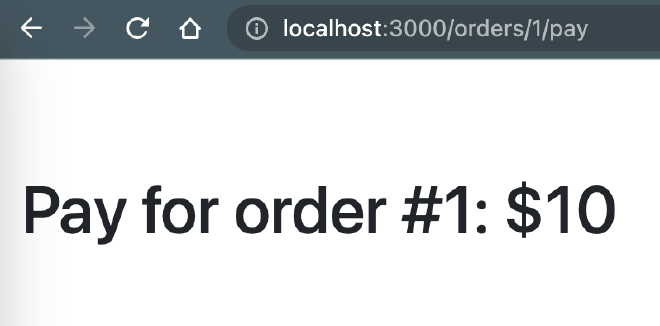
On the screenshot, you can see $10, which is 1000 in the database.
Add a payment link to the order page orders/show.html.erb:
<p><%= link_to "Pay for order", order_pay_path(order_id: @order.id), class: "btn btn-success" if @order.status == "pending" %></p>
Accepting payments #
Set up the server #
First, we need to add the Stripe gem into the Gemfile:
gem 'stripe'
After executing bunde install, add Stripe to application_controller.rb:
class ApplicationController < ActionController::Base
   require 'stripe'
   Stripe.api_key = 'Your Secret Key'
end
Put your Secret Key from the Stripe Dashboard into the api_key.
Now for each order, we need to create a PaymentIntent. It tracks the customer’s payment lifecycle, keeping track of any failed payment attempts and ensuring the customer is only charged once.
Modify the payments_controller.rb file:
class PaymentsController < ApplicationController
  before_action :authenticate_user!

  def pay
    @order = Order.find(params[:order_id])

    @payment_intent = Stripe::PaymentIntent.create({
      amount: @order.total,
      currency: 'usd',
      automatic_payment_methods: {enabled: true},
      description: "Order #{@order.id}"
    })
  end
end
With automatic_payment_methods enabled, Stripe enables cards and other common payment methods for you by default, and you can enable or disable payment methods directly in the Stripe Dashboard. Before displaying the payment form, Stripe evaluates the currency, payment method restrictions, and other parameters to determine the list of supported payment methods. It prioritizes payment methods that help increase conversion and are most relevant to the currency and the customer’s location.
We also need to store information about this PaymentIntent. Let’s create a new migration:
class AddPaymentIntentIdToOrders < ActiveRecord::Migration[7.0]
  def change
    add_column :orders, :payment_intent_id, :string
  end
end
Don’t forget to run rails db:migrate.
In the future, we will need the client secret from the PaymentIntent. Let’s store the id of the PaymentIntent in our DB:
class PaymentsController < ApplicationController
  before_action :authenticate_user!

  def pay
    @order = Order.find(params[:order_id])

    if @order.payment_intent_id
      payment_intent = get_payment_intent
    else
      payment_intent = create_payment_intent
      @order.update!(payment_intent_id: payment_intent.id)
    end

    @payment_intent_client_secret = payment_intent.client_secret
  end

  private

  def create_payment_intent
    Stripe::PaymentIntent.create({
      amount: @order.total,
      currency: 'usd',
      automatic_payment_methods: {enabled: true},
      description: "Order #{@order.id}"
    })
  end

  def get_payment_intent
    Stripe::PaymentIntent.retrieve(@order.payment_intent_id)
  end
end
Complete the payment page #
To be able to use Stripe on the front end, we need to connect Stripe JS SDK. To do so, add this line in the <head> of layouts/application.html.erb:
<script src="https://js.stripe.com/v3/"></script>
Now add this form to the pay.html.erb file:
<form id="payment-form" data-controller="checkout" data-stripe-publishable-key="Your Publishable Key" data-stripe-client-secret="<%= @payment_intent_client_secret %>">
  <div id="payment-message" class="hidden"></div>
  <div id="payment-element"></div>
  <button id="submit" class="btn btn-success mt-3">
    <div class="spinner hidden" id="spinner"></div>
    <span id="button-text">Pay now</span>
  </button>
</form>
You need to copy the Publishable key from the Stripe Dashboard and paste it into the value of the data-stripe-client-secret attribute.
Now we have to use the JS in the Stimulus controller.
Create a new checkout_controller.js:
import { Controller } from "@hotwired/stimulus"

export default class extends Controller {
  connect() {
    const stripe = Stripe(this.element.getAttribute('data-stripe-publishable-key'));

    let elements;

    initialize(this.element.getAttribute('data-stripe-client-secret'));
    checkStatus();

    this.element.addEventListener("submit", handleSubmit);

    async function initialize(client_secret) {
      elements = stripe.elements({ clientSecret: client_secret });

      const paymentElement = elements.create("payment");
      paymentElement.mount("#payment-element");
    }

    async function handleSubmit(e) {
      e.preventDefault();
      setLoading(true);

      const { error } = await stripe.confirmPayment({
        elements,
        confirmParams: {
          return_url: "http://localhost:3000/orders/"
        },
      });

      if (error.type === "card_error" || error.type === "validation_error") {
        showMessage(error.message);
      } else {
        showMessage("An unexpected error occurred.");
      }

      setLoading(false);
    }

    async function checkStatus() {
      const clientSecret = new URLSearchParams(window.location.search).get(
        "payment_intent_client_secret"
      );

      if (!clientSecret) {
        return;
      }

      const { paymentIntent } = await stripe.retrievePaymentIntent(clientSecret);

      switch (paymentIntent.status) {
        case "succeeded":
          showMessage("Payment succeeded!");
          break;
        case "processing":
          showMessage("Your payment is processing.");
          break;
        case "requires_payment_method":
          showMessage("Your payment was not successful, please try again.");
          break;
        default:
          showMessage("Something went wrong.");
          break;
      }
    }

    function showMessage(messageText) {
      const messageContainer = document.querySelector("#payment-message");

      messageContainer.classList.remove("hidden");
      messageContainer.classList.add("alert");
      messageContainer.classList.add("alert-danger");
      messageContainer.textContent = messageText;
    }

    function setLoading(isLoading) {
      if (isLoading) {
        document.querySelector("#submit").disabled = true;
        document.querySelector("#spinner").classList.remove("hidden");
        document.querySelector("#button-text").classList.add("hidden");
      } else {
        document.querySelector("#submit").disabled = false;
        document.querySelector("#spinner").classList.add("hidden");
        document.querySelector("#button-text").classList.remove("hidden");
      }
    }
  }
}
Pay attention to the return_url. This is a link where users will be redirected after they complete the payment. There might be successful or failed results.
Sometimes, the user will stay on the current page and see a message with the corresponding error in case of failed payment. We will look at this later.
Don’t forget to include this controller in index.js:
import CheckoutController from "./checkout_controller.js"
application.register('checkout', CheckoutController)
On the order page, we will display a message about the order status (orders/index.html.erb):
<% if params["redirect_status"] == "succeeded" %>
  <div class="alert alert-success">Payment successful</div>
<% elsif params["redirect_status"] == "failed" %>
  <div class="alert alert-danger">Payment failed. Please try again with a different payment method.</div>
<% end %>
Now you can test the payment process. Let’s open our order and click the pay button. You should see the payment form:
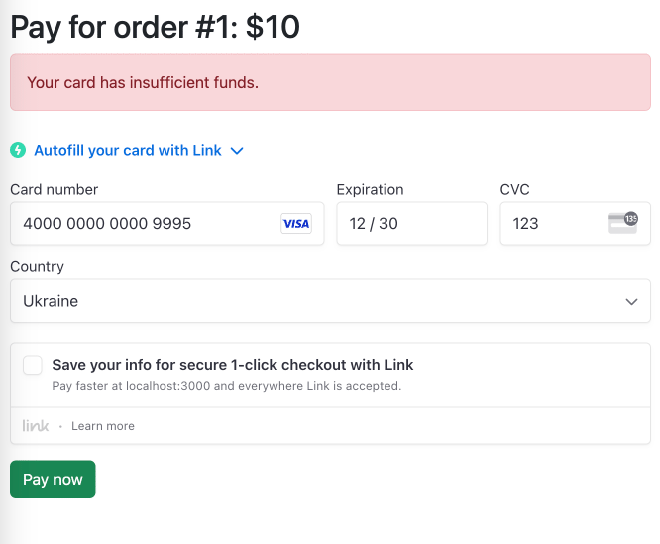
In test mode, only special cards can be used.
Enter card number 4000 0000 0000 9995 with any expiration and CVC.
You will see this error:
Now let’s change the card number to 4000 0025 0000 3155.
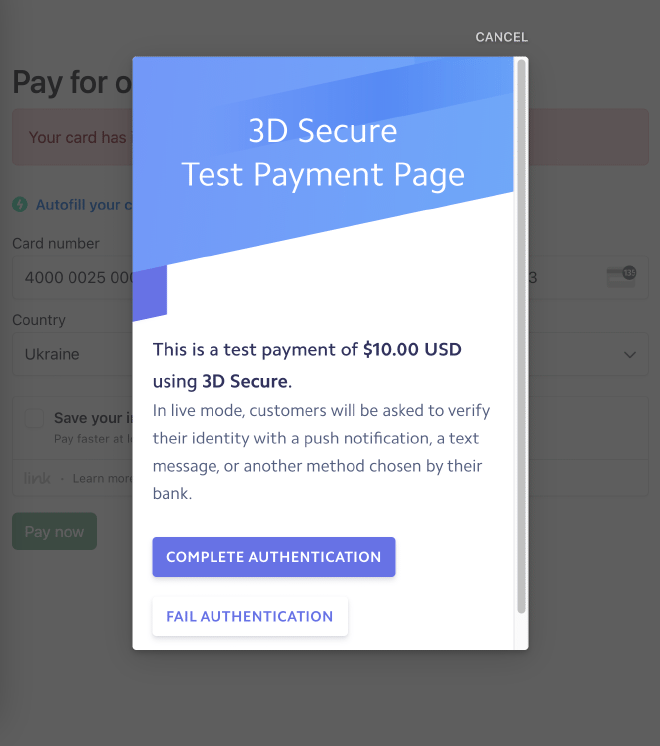
You will see a pop-up with payment confirmation. In live mode (that is, production), instead of this text, you will see information from your bank, which may request confirmation using a code in SMS or a mobile application.
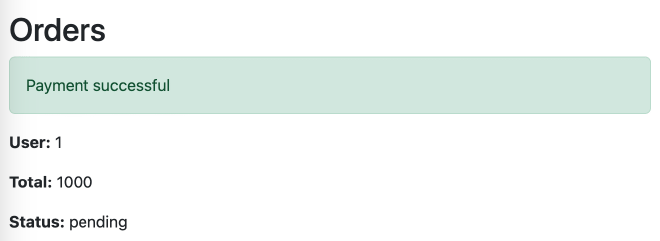
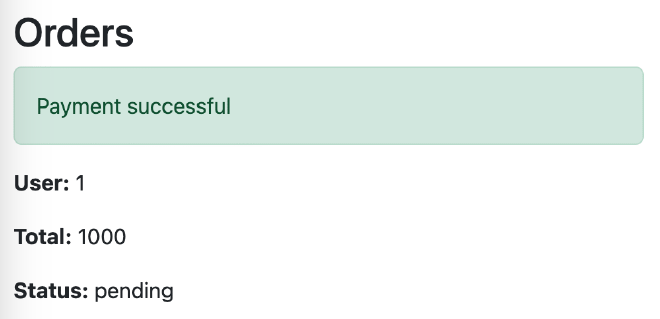
Click on “Complete Authentication” and you will be redirected to the orders page with a successful payment notification:
In the Stripe Dashboard’s Payments section, you will see a successful payment:

Now we need to update the order status in our database.
Update order status #
Stripe needs to tell our server about the result of the payment.
The obvious implementation would be to check the status of the PaymentIntent on the order page. Don’t do this! During the payment process, the user may have problems with the Internet or they may accidentally close the tab, then the payment will pass, but the redirect will not occur and you will lose information about successful payment. That is, money will be withdrawn from the client’s account, but the status of the order in our database will still be “pending”.
To avoid this situation, we need to use a webhook.
Add a new route to routes.rb:
post "/webhooks/payment", to: "payments#webhook"
Next, update payments_controller.rb:
class PaymentsController < ApplicationController
  before_action :authenticate_user!, except: [:webhook]
  skip_before_action :verify_authenticity_token, only: [:webhook]

  def pay
    @order = Order.find(params[:order_id])

    if @order.payment_intent_id
      payment_intent = get_payment_intent
    else
      payment_intent = create_payment_intent
      @order.update!(payment_intent_id: payment_intent.id)
    end

    @payment_intent_client_secret = payment_intent.client_secret
  end

  def webhook
    payload = request.body.read
    event = nil

    begin
      event = Stripe::Event.construct_from(
        JSON.parse(payload, symbolize_names: true)
      )
    rescue JSON::ParserError => e
      render plain: "Webhook error while parsing basic request. #{e.message}", status: 400
      return
    end

    endpoint_secret = "Your Endpoint Secret"
    if endpoint_secret
      signature = request.env['HTTP_STRIPE_SIGNATURE']
      begin
        event = Stripe::Webhook.construct_event(
          payload, signature, endpoint_secret
        )
      rescue Stripe::SignatureVerificationError => e
        render plain: "Webhook signature verification failed. #{e.message}", status: 400
        return
      end
    end

    payment_intent = event.data.object
    case event.type
    when 'payment_intent.succeeded'
      handle_payment_intent_status(payment_intent, 'succeed')
    when 'payment_intent.processing'
      handle_payment_intent_status(payment_intent, 'processing')
    when 'payment_intent.payment_failed'
      handle_payment_intent_status(payment_intent, 'failed')
    end

    render plain: "Status updated", status: 200
  end

  private

  def create_payment_intent
    Stripe::PaymentIntent.create({
      amount: @order.total,
      currency: 'usd',
      automatic_payment_methods: {enabled: true},
      description: "Order #{@order.id}"
    })
  end

  def get_payment_intent
    Stripe::PaymentIntent.retrieve(@order.payment_intent_id)
  end

  def handle_payment_intent_status(payment_intent, status)
    Order.find_by(payment_intent_id: payment_intent.id).update!(status: status)
  end
end
Note that in the first lines, we disabled Devise authorization for the webhook.
There is also an endpoint_secret variable here, we will tell you what value to specify later.
To test the webhook, you will need to install the Stripe CLI.
Once installed, run the stripe login command in the Terminal and log in with your browser.
Now execute stripe listen --forward-to http://localhost:3000/webhooks/payment> (remember to replace your local address here) and you will see the webhook signing secret. Paste its value to the endpoint_secret variable.
After restarting the server, we can test the webhook.
Create a new order and try to pay with the card 4242 4242 4242 4242 and any expiration date and CVC.
You will see a message about successful payment and the status of the order is “pending”:
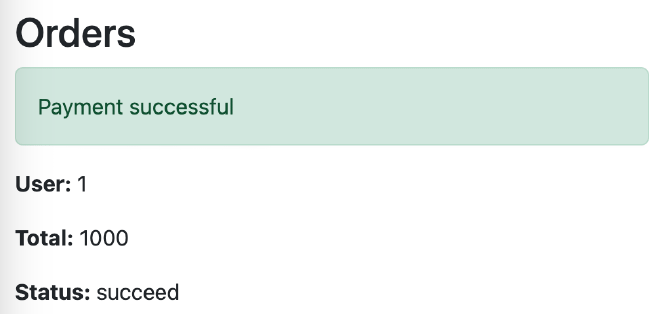
Refresh the page and it will change to “succeed”:
Go live #
Here’s what you need to do to accept real payments on production:
- Finish registering your business on Stripe.
- In Stripe Dashboard enable live mode, copy your Publishable and Secret keys and paste the value on the production server settings.
- In the webhooks settings add your production server details and update the
endpoint_secretvalue on your server.
Summary #
You can use Stripe to accept payments on your web application. It has detailed documentation, easy to integrate, and accepts most payment methods for different regions.
We are ready to provide expert's help with your product
or build a new one from scratch for you!