HTTP live streaming with AWS
Table of Contents
What is HLS? #
Everything starts with a problem 😊.
Let’s say you have an application with frontend and backend on Rails (congratulations, you’re in luck). And suppose your application can upload videos and then play them. In this case, let’s consider a well-known issue related to video playback delays, especially in high quality and particularly with a slow internet connection. What could be the cause? I won’t claim to speak for the entire internet, but in most cases, it’s related to the fact that before starting to play a video, it needs to be loaded onto the client (frontend), and only then can playback begin. If the video file is quite large and the internet connection is not super fast, the process can be painfully slow.
In this case, HLS can help us.
HTTP Live Streaming (also known as HLS) is an HTTP-based adaptive bitrate streaming communications protocol developed by Apple Inc. The input video is prepared for distribution by segmenting it into fragments (chunks) of equal length and index file(or Media Playlist). Media Playlist - is a special file that contains references to the fragmented files. There could be a Master Playlist, that contains references to index files of different bitrates. In this way, HLS dynamically adjusts the bitrate of the video to suit the client’s network conditions.
Schematically, this file system can be represented like this:
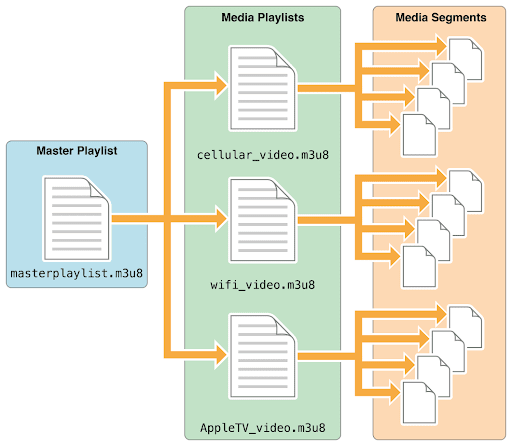
The Master Playlist file has extension ‘.m3u8’ and inside looks smt like this:
#EXTM3U
#EXT-X-STREAM-INF:PROGRAM-ID=1,BANDWIDTH=935000,RESOLUTION=242x432,CODECS="avc1.4d001f,mp4a.40.2"
cellular_video.m3u8
#EXT-X-STREAM-INF:PROGRAM-ID=1,BANDWIDTH=2279000,RESOLUTION=304x540,CODECS="avc1.4d001f,mp4a.40.2"
wifi_video.m3u8
#EXT-X-STREAM-INF:PROGRAM-ID=1,BANDWIDTH=6559000,RESOLUTION=608x1080,CODECS="avc1.4d001f,mp4a.40.2"
appletv_video.m3u8
The Media Playlist files have the same extension and could contain the following text:
#EXTM3U
#EXT-X-VERSION:3
#EXT-X-MEDIA-SEQUENCE:0
#EXT-X-ALLOW-CACHE:YES
#EXT-X-TARGETDURATION:7
#EXTINF:6.066667,
cellular_video_00000.ts
#EXTINF:6.000000,
cellular_video_00001.ts
#EXTINF:6.000000,
cellular_video_00002.ts
#EXTINF:6.000000,
cellular_video_00003.ts
#EXTINF:6.000000,
cellular_video_00004.ts
#EXTINF:1.066667,
cellular_video_00005.ts
#EXT-X-ENDLIST
Here, the “cellular_video_00000.ts” is a link to chunk - a little fragment of the video.
An M3U8 file is a UTF-8 encoded audio playlist file.
- M3 - stands for M3U format, is a standard for representing multimedia playlists
- U8 - stands for Unicode 8-bit. It signifies that the file uses the Unicode character encoding.
So, how we can implement HLS for the Rails application? #
As we assumed earlier, you should have a Rails application with configured video uploading. Additionally, you need to have an AWS account with a configured S3 bucket where uploaded videos are stored.
This article will cover the application of the following tools and services:
High-level schema of video transcoding flow #
Video transcoding in one word - is the process of converting a video file from one format to another. In our case, Elastic Transcoder not only transcodes the video but also generates the Master Playlist and media playlists and even a thumbnail for the video. All of this is functions are highly flexible and can be conveniently configured.
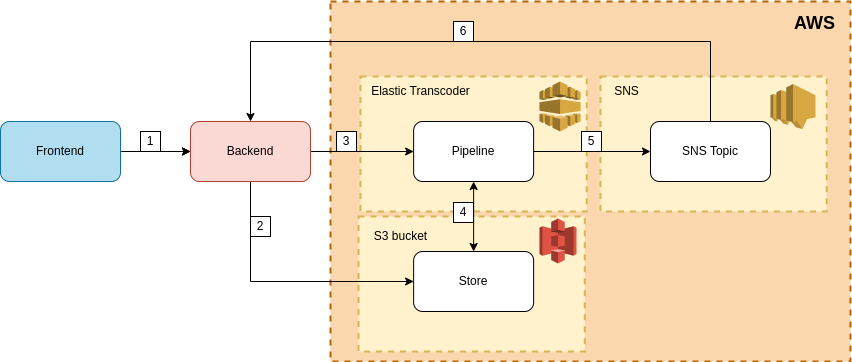
- Frontend sends a request to upload the video file
- Backend uploads video file to the AWS S3 bucket
- Backend creates transcoding job in Pipeline
- Job gets the file from S3 and processes it, then puts the results file back into the S3
- After transcoding is finished successfully job sends an event to the Simple Notification Service(SNS) topic
- The SNS topic sends a webhook to the backend
Set up AWS environment #
-
Set up SNS service.
To create an SNS in AWS, you can follow the instructions provided by AWS here. When creating a Topic, you will need to choose the Topic type – select ‘Standard’ like on the image:We choose this type because it supports the HTTP protocol (unlike the FIFO type), and we plan to receive a webhook at an endpoint that we will create in our Rails API. You can use the default settings for all other configurations when creating the Topic.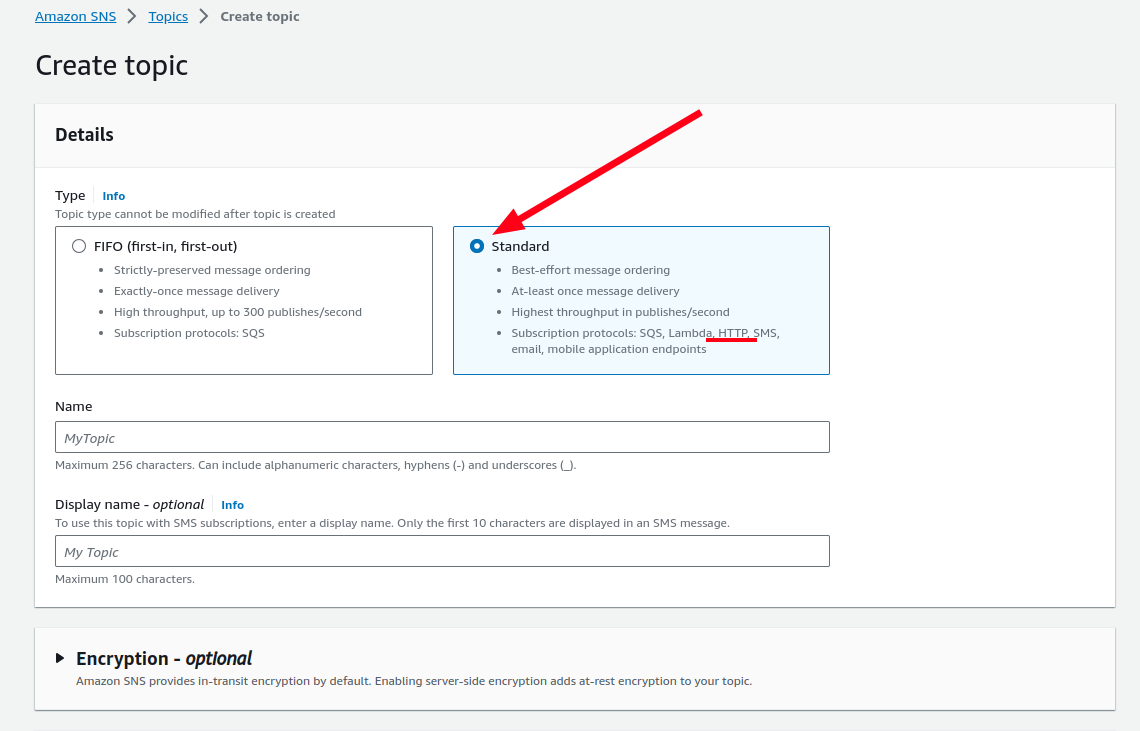
-
Set up a subscriber with rails endpoint
The next step is to create a subscriber for the topic created earlier. This AWS guide will assist you with the process. When creating the subscriber, you need to specify the topic from step 1, choose the HTTPS protocol, and provide the URL of the endpoint, which formally doesn’t exist yet, but you can still specify it for example https://api/sns_webhook.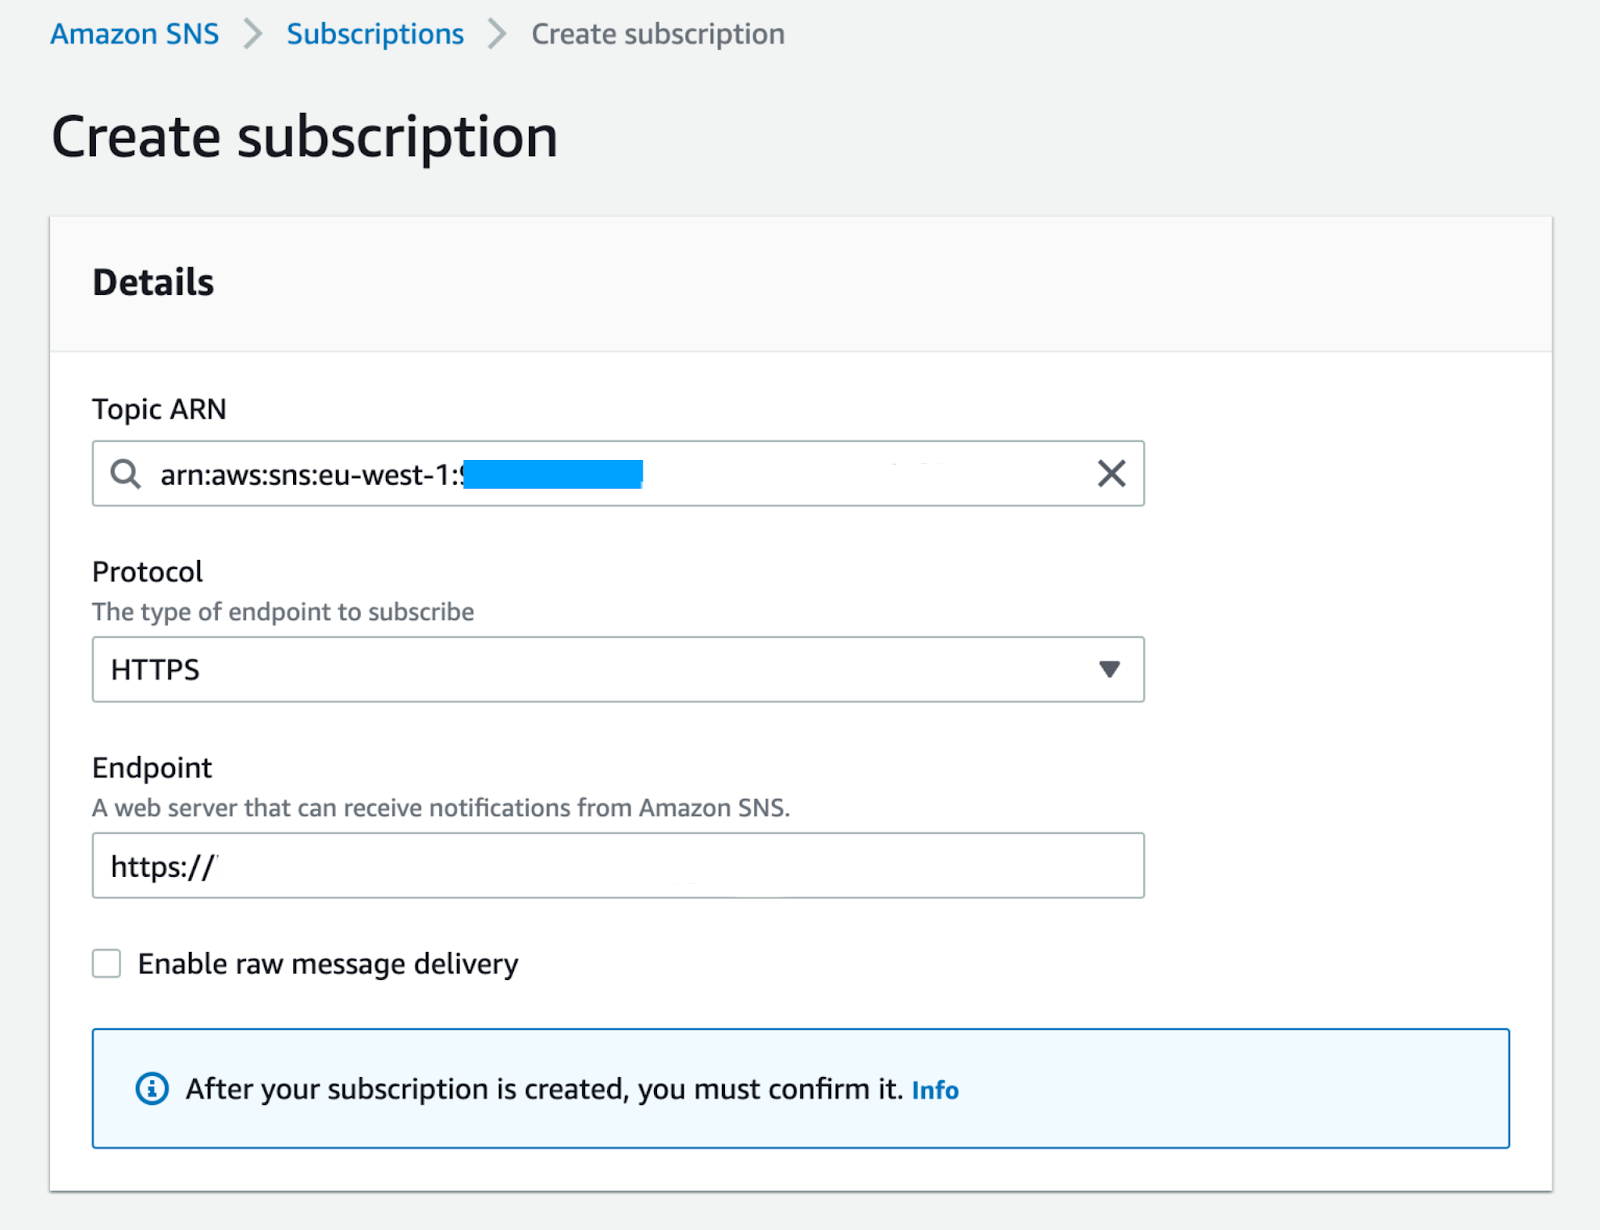
After creating the subscriber, you will need to confirm it. For this, AWS sends a sort of test webhook that we will need to handle. We’ll come back to this a bit later. For now, let’s save what we have. -
Create Elastic Transcoder Pipeline
Next, let’s proceed with the creation of the pipeline specifically for video transcoding. Here, a very detailed guide from AWS comes to our aid again. You only need to come up with your name for the pipeline and specify the S3 bucket where the transcoder will place the results of its work. In our case, you can specify the same bucket for all purposes. What I want to draw your attention to is the penultimate point - Notifications. To make our scheme work, we need to choose the radio button “Use an existing SNS topic” here and in the dropdown menu, select our previously created topic: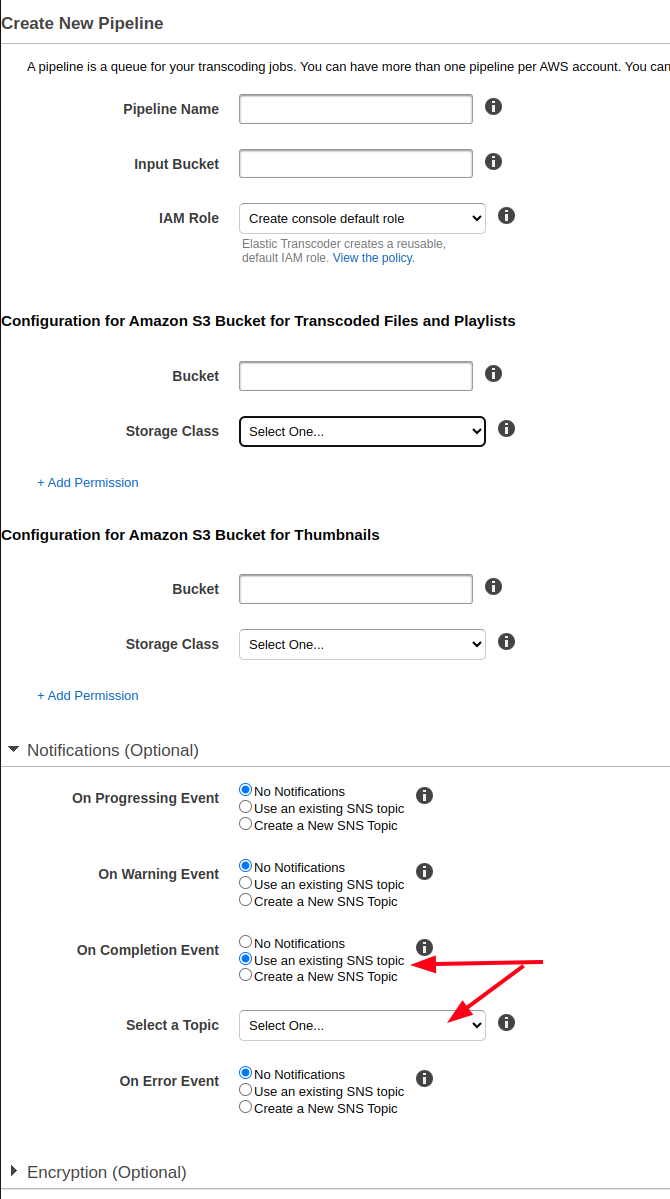
-
Set up Transcoder Presets(Optional)
A preset is a template that contains the settings that you want Elastic Transcoder to apply during the transcoding process, for example, the codec and the resolution that you want in the transcoded file. It’s optional because AWS provides system presets that create media files that play on many common devices and system presets that target specific devices. So, you don’t need to create your own custom preset, you can use the system ones if they meet your needs. Nevertheless, here is a very detailed setup guide for the preset, providing a comprehensive description of all possible output settings.
Set app backend logic #
- Install gem
To install the gem, add the following line to your Gemfile and run bundle install.
gem 'aws-sdk', '~> 3'- Create an endpoint for SNS webhooks
Now it’s time to configure the server-side part of our scheme. As we agreed earlier, let’s create the following route - https://api/sns_webhook. Next, we need to configure our action in the controller in such a way as to handle the subscription confirmation message from the SNS Topic. How to do this is described in detail in the AWS documentation here. The action to confirm the subscription and handle notifications may look something like this:
class SnsWebhookController < ApplicationController
def sns_webhook
# Check if it's a subscription confirmation message
if request.headers['x-amz-sns-message-type'] == 'SubscriptionConfirmation'
confirm_subscription(request.headers['x-amz-sns-subscription-arn'], request.headers['x-amz-sns-token'])
elsif request.headers['x-amz-sns-message-type'] == 'Notification'
handle_notification(JSON.parse(request.body.read))
end
head :ok
end
private
def confirm_subscription(subscription_arn, token)
sns_client = Aws::SNS::Client.new(region: 'your_region', access_key_id: 'your_access_key', secret_access_key: 'your_secret_key')
sns_client.confirm_subscription(
topic_arn: subscription_arn,
token: token
)
rescue StandardError => e
# Handle the confirmation error (log, notify, etc.)
Rails.logger.error("Failed to confirm subscription: #{e.message}")
end
def handle_notification(notification)
# Your logic to handle the SNS notification
# Extract relevant information from the 'notification' hash
Rails.logger.info("Received SNS Notification: #{notification.inspect}")
end
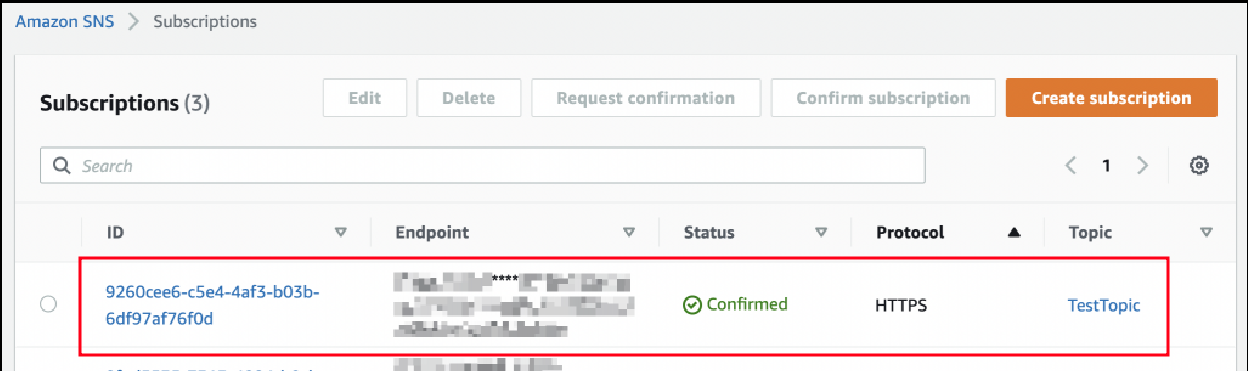
endAfter implementing such or a similar action for subscription confirmation, don’t forget to return to our SNS Topic and send the subscription confirmation. The confirmed subscription should look something like this:
- Create a job for transcoding the video
Now let’s make the ball rolling by inserting code into the business logic of your project, where you handle video files, to launch the transcoding job with the necessary parameters. An example of the code creating such a job:
et_client = Aws::ElasticTranscoder::Client.new

response = et_client.create_job(
    pipeline_id: ENV['TRANSCODER_PIPELINE_ID'],
    output_key_prefix: store_dir_name",
    input: {
        key: path_to_original_video
    },
    outputs: [
        {
            key: "cellular_video_#{id}",
            segment_duration: ENV['HLS_SEGMENT_DURATION'],
            preset_id: ENV['CELLULAR_BITRATE_PRESET_ID']
        },
        {
            key: "wifi_video_#{id}",
            segment_duration: ENV['HLS_SEGMENT_DURATION'],
            preset_id: ENV['WIFI_BITRATE_PRESET_ID']
        },
        {
            key: "appletv_video_#{id}",
            thumbnail_pattern: "#{name}.thumb.{count}",
            segment_duration: ENV['HLS_SEGMENT_DURATION'],
            preset_id: ENV['APPLETV_BITRATE_PRESET_ID']
        }
    ],
    playlists: [
        {
            name: master_playlist_name,
            format: "HLSv3",
            output_keys: ["cellular_video_#{id}", "wifi_video_#{id}", "appletv_video_#{id}"],
        },
    ],
    user_metadata: {
        'user_id' => video.user.id.to_s,
        'the_some_key' => 'any information you need'
    }
)
TRANSCODER_PIPELINE_ID - you get from AWS Elastic Transcoder Service
HLS_SEGMENT_DURATION - custom value that you can define in seconds for chunk duration
CELLULAR_BITRATE_PRESET_ID/ WIFI_BITRATE_PRESET_ID / APPLETV_BITRATE_PRESET_ID - preset id that you chose for this connection type
For more code samples for Ruby you can find here.
Now, after this code executes, on the AWS side the video is transcoded in the job, and you will receive a webhook with the job ID and the status as ‘COMPLETED’.
Sample of the SNS webhook json:
{
    "state" : "COMPLETED",
    "errorCode" : "the code of any error that occurred",
    "messageDetails" : "the notification message you created in Amazon SNS",
    "version" : "API version that you used to create the job",
    "jobId" : "value of Job:Id object that Elastic Transcoder returns in the response to a Create Job request",
    "pipelineId" : "value of PipelineId object in the Create Job request",
    "input" : {
        job Input settings
    },
    "outputKeyPrefix" : "prefix for file names in Amazon S3 bucket",
    "outputs": [
        {
            applicable job Outputs settings,
            "status" : "Completed"
        },
        {...}
    ],
    "playlists": [
        {
            "name" : string,
            "status" : string,
            ...
            ..
        }
    ],
    "userMetadata": {
        "metadata key": "metadata value"
    }
}
Now we need to generate a link to the master playlist, which is located according to your settings in the S3 bucket. Doing this is a breeze :). Since when launching the job, you specify the folder on S3 where the results will be stored, you know the path to this folder exactly - it will look something like https://your-domain.s3.us-west-2.amazonaws.com/store_dir_name. You also specified the playlist name - ‘master_playlist_name.m3u8’. Combine this data, and you’ll get a link to the master playlist that you can pass in the video request - https://your-domain.s3.us-west-2.amazonaws.com/store_dir_name/master_playlist_name.m3u8.
Checking the functionality of the master playlist link is quite easy - simply paste the link into any modern browser (such as Safari or Chrome).
Almost all of them support HLS out of the box. Alternatively, you can “feed” the master playlist link to VLC.
Summary #
As a result of all this, when requesting video playback from the frontend, instead of a link to the original file, you need to send a link to the Master Playlist. Then, the HLS protocol will determine which of your presets is most suitable for the user’s connection quality and load chunks from it. In this way, we improve the user experience when playing video files.
We are ready to provide expert's help with your product
or build a new one from scratch for you!